How to DIY 42 watt LED room light
Last week, one of the three halogen light bulbs got broken. So I had the choice of replacing the one light bulb or searching for another possibly better way to light up my room. I really like LEDs so I searched for some ideas for a complete room.
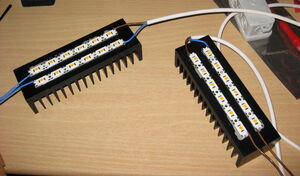
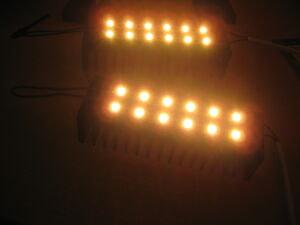
My goal was to reach at least 3000 lumen. I found some nice high power led stripes with a high CRI of 90. Unfortunately they need heatsinks, which I never used before in any project. In the following I will give you a complete partlist and a rough assembly guide with some hints. But first some pictures of the finished LEDs with heatsink. As you can see, I am really not very good at combining the parts, but it works, and that’s the important thing ;) .
You need basic soldering skills to connect wires to the LED stripes.
The whole system has a total power consumption of 42W. The heatsinks heat up to 45°C. Theoretical about 2800 lumen, but I can’t measure that. It is bright enough to light my whole room. My previous lamp had 2x 50W halogen light bulbs and was much darker.
Part List
- 2x PowerBar LED Strip 12 LEDs CRI 90+, warm white
- 2x Profile Heatsink, 50x160x40mm, 1.2 K/W
- Switching Power Supply for LED, 50W / 9-48V / 1050mA
- Arctic Silver Thermal Adhesive
- 2x Moisture-proof junction box 75x37x40mm
- Hose, 2×0,75mm², white, 5m ring
- Power cord with Euro plug, 1.8 m, white
- Some luster terminals
There are links to the important components. The other parts can differ depending on your location and choice. I spent around 95€ for all parts without shipping.
Warning: If you change one of the first three components, you have to recalculate if they match. So if you want to use other LEDs, you should look into their specifications if you can power them with a constant current of 1050mA below 50W. Else you have to use another power supply. The heatsink has to be able to cool the LEDs. All heatsinks have a cooling efficiency in the specs. The unit is Kelvin per Watt. So your heatsink will heat up to (room-temperature + watts of LEDS) * x K/V, where x is this efficiency value. Assembly
I will describe some basic steps. Always be careful with high voltages and high currents. Check twice for connections or not.
- Connect your power cord to the power supply on the side with a marking ‘AC’. Put one of the 2-luster terminals inside one of the junction boxes and connect the wires. Often they are color coded, but it doesn’t really matter which of the wires you connect.
- Part both LED stripes into two equally sized pieces and connect them with a wire exactly at that point. Have a look at the first picture. You can see a blue/red wire connecting the divided LED stripes. That’s exactly what you have to do now.
- Use the paired cable with hose to connect to the other sides of the LED stripe parts. Connect the red cable to the LED stripe with a ‘+’ and connect the black/blue cable to the ‘-’. You can see it in the first picture.
- Connect both paired cables from the LEDs and the remaining cables from the power supply in a junction box with a luster terminal. At this point the wire color is important. black/blue has to be connected to black/blue and red to red.
- Now check all connections and non-connections. Use a simple resistance-meter to measure the resistance between the red wires in the junction box with the ‘+’ sides of the LED stripes. It should show something close to 0. Measure the red wires against the ‘-’ sides. it should be infinity. Repeat it for blue/black and ‘-’ and don’t forget to check the parted led-stripes for connection. This step is really important because you could destroy the LEDs if there is a connection missing or you could even create a short.
- Time for a first test. Do not look into the LEDs. Instead try to direct them away from you. Do not touch the top of the LED stripes or any other electrical part. Now plug in the power cord and make a fast check for functionality. If one of the LED stripes is not working, disconnect it immediately, and check where the problem is. If everything is working, you can continue with the next step.
- Now it’s time to put the LEDs onto the heatsinks. You carefully read the arctic silver thermal adhesive manual before continuing.
- Prepare something to hold LEDs in place on the heatsink. Then mix the two parts of the thermal adhesive 1:1 on some plastic sheet and put a thin layer of the mixed paste onto the back side of the LEDs. Finally put them in position onto the heatsinks and press them down for a short time. Fix their position on the heatsink.
- Wait for 30 minutes or more. You shouldn’t be able to move the LEDs on the heatsink anymore. Start a long running test to observe the temperature. Run it for about 30 minutes and frequently measure the temperature of the led alluminium stripe. Do not touch any electrical parts, while doing so, and do not look into the leds. The temperature should keep within room temperature + 30°C.
Finally you are done and have a very bright LED lamp. You could add some milk glass in front of the leds or use them indirect so noone is able to look into them.
Always be careful while working with electronical stuff and high brightness components. Use this guide at your own risk. I take no responsiblity for damage of any kind.
If you have any question, feedback or built something similar, please leave a comment.


